 FREE 1 to 3-Day Delivery on Orders $119+ Details
Best Sellers


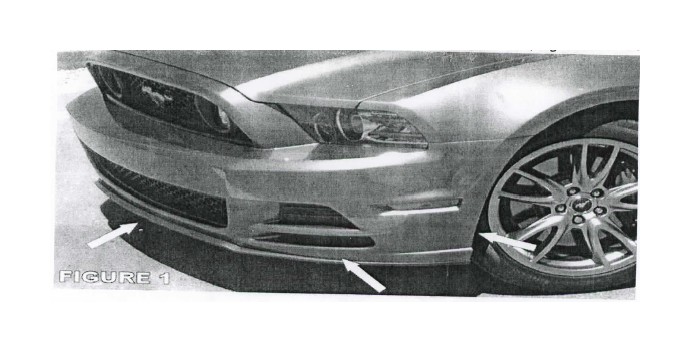
How to Install Street Scene Gen 2 Chin Spoiler (13-14 GT, V6) on your Ford Mustang
INSTALLATION INSTRUCTIONS
NOTE: Fit all parts before painting (See special instructions for paint Prep.) Parts that have been installed, prepped, or painted are not returnable.
VERY IMPORTANT! Read and understand all directions and check the following parts list before starting installation.
1. After the front lip spoiler is prepped and painted, double sided tape should be applied to the indentation on the inside of the front spolier. This surface has to be CLEAN and DRY for the tape to properly adhere. A residual free cleaner is recommended (e.g. Wurth Clean Solve) to prepare the surface. The surface of the vehicle should also be prepped and cleaned to for proper adhesion. (Fig.2) For best results after cleaning use the adhesion promoter provided to the areas where the tape will be used. When applying tape, make sure the tape is smooth and wrinkle free. It is best to use the multiple small pieceson the long section rather than 1 long piece.
2. After applying the tape pul back approximately 1 inch of the protective covering from the tape on each end. Make sure the film is sticking out. (Fig. 2) Place the front lip spoiler GENTLY on the vehicle and make sure you have it positioned correctly. It is good to have someone help you with this. Remember when using adhesion promoter you will not get a second chance! So make sure it is on correctly. While holding it in position, pull the tabs you created while applying light downward pressure. Continue this taking care not to tear off the tabs by pulling to hard. After all the film is removed, apply frim pressure all around to insure the tape has bonded properly .
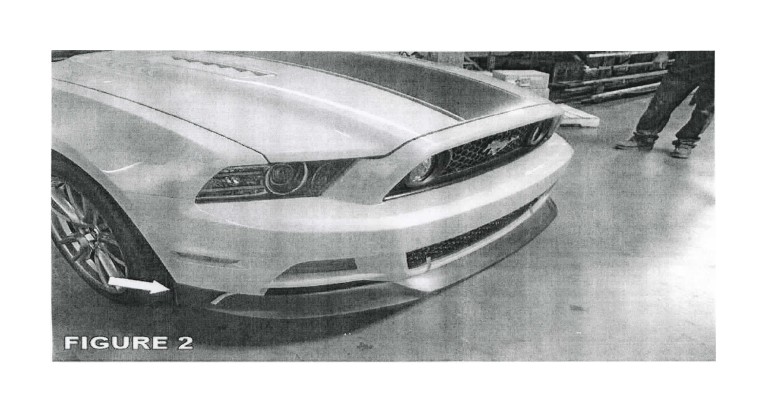
3. Use the provided self tapping screws to secure the back of the spoiler onto the vehicle.(Fig.2 Arrow)
4. Done! Enjoy you front lip spoiler!
STREET SCENE URETHANE PAINT PREPERATION
PROPER PAINTING TECHNIQUES FOR POLY URETHANE PRODUCTS
ALL PARTS SHOULD BE PROFESSIONALLY PAINTED
Pre-fit the component to vehicle. Once you are assured that you have the right component you may proceed, we highly recommend using masking tape anywhere the component may be touching the vehicle body to prevent scratches during the pre-fit.
1. The first step will help to remove pinholes and bubbles that form in the poly urethane. First use a 220 grit sand paper with a DA sander. Sand part complete.
2. Next clean part with aerosol cleaner ( wax & grease remover ).
3. Spray booth: Prime part complete. ( Use PCL 905 primer ).
4. Once part is dry, sand with 320 DA sander. To finish the part wet sand entire part with 400 grit sand paper by hand. This will! give the part a nice finish before painting it.
5. Clean part again.
6. Spray booth: Next spray sealer, Use DP 48 ( PPG white sealer ). Do this to make the part white before painting it. With the part still in the spray booth then finish painting the part with the factory matched color, and then finish with clear coat. ( Use PPG 2010 clear ).
7. Neat color sand / wet sand the part. First use 1000 grit wet / dry sand paper and sand any dirt or runs out. Then go over the entire part with 1500. Last go over the part with 2000. Sand mostly the smooth and flat surfaces, trying to stayaway from the edges so that you do not burn ( go through the painted surface) it laterusing the buffer.
8. Next buff it with a rubbing compound, and finish it with polish. Wash the surface and you will have a beautifully finished part.
ON ALL THE SSE URETHANE PARTS THE PREFERRED PROCEDURES ARE :
A. Pre-fit, sand and shape
B. Paint
C. Install
